Sunday, March 30, 2014

How to Make Chalk Paint


So, I ended up doing a little experiment today after some research and I'm really happy with the results!  
I have always wanted to use chalk-paint to refinish a piece of furniture, but balked at the price of pre-made paints. Brands like "Annie Sloan Chalk Paint" can run almost $35/quart!  Being the cheap...ahem... THRIFTY person that I am, I thought that there must be a less expensive way to do it!

After some research, I found there are several different recipes floating out there on the interweb that included (but are not limited to) adding unsanded grout, Plaster of Paris, smashed sidewalk chalk, or baking soda to regular latex paint to get that antiqued matte finish.

At first I thought Plaster of Paris seemed like a good idea since it seemed to be used by many pro furniture refinishers, but after doing some digging I found that it could potentially be highly carcinogenic to use.  I have a young child, and do not like the idea of carcinogens floating around where he is, so I opted to try the baking soda method.  I wasn't expecting great results because, honestly, how could some 80-cent off brand baking soda get the same look as a $40/quart of paint?  
But I was pleasantly surprised. It turned a $15 thrift table that was super glossy and much to red/orange finished for my taste:


BEFORE

Into a "shabby chic" masterpiece!


AFTER!


Things You Will Need:

-1/2 cup baking soda
-3 Tbsp water
-1 cup latex paint (I used Glidden Low VOC Duo)
-Plastic mixing bowls
-Paint brush
-Drop Cloth
-MinWax paste finishing wax
-Fine grain Sand paper (optional)


1.) Pour 1/2 cup baking soda into one of the plastic mixing bowls and add 3 Tbsp COLD water.  Mix until baking soda is completely liquified and no lumps remain.

2.) Pour 1 cup latex paint of your choice into a separate mixing bowl.  Add baking soda mixture and stir until well combined.

3.) Paint your furniture using long, even strokes.  The paint mixture dries quickly, so keep this in mind.  I like to press the brush to make some of the underlying wood show through and get that "shabby chic" vibe.  You may need 2 coats depending on the look you want, so allow at least 30 minutes of dry-time between coats.

4.) If you are wanting an additional "aged" look to your furniture, use sandpaper to lightly sand down edges, corners, knobs or any other place that would be worn naturally over time.

Create a "weathered" appearance with sandpaper

Sanding on feet


5.) Apply coat of Minwax finishing paste with a clean rag. After it dries, you may buff it with a rag to get some shine.

All done!  It was so easy and inexpensive that I wish I would have tried it sooner!  Next, I have some dining room chairs that are calling for some yellow chalk paint...


Saturday, March 15, 2014

Make Your Own Wet-Bag

                                  Much Cuter Than a Plastic Bag

About a month after my son was born, I decided I wanted to cloth diaper him.  Aside from diapers, the second most important item for cloth diapering was my trusty wet-bag.  What is a wet-bag?  Well, it's an adorable and eco-friendly alternative to carrying plastic bags around. What do you do with soiled diapers when you're on the go? Throw them in a waterproof wet-bag. But wet-bags are great for many other things besides diaper changes including, but not limited to: a way to transport wet/sandy bathing suits, funky post-workout clothes, or makeup and toiletries. They are fab for potty-training and other clothing accidents (I keep a wet-bag in the back of my car and an extra outfit for my son... so if...no...WHEN he decides to dump juice all over the front of him I throw the soiled clothes in the wet bag). A wet-bag is a very, very useful thing to have with or without kids. I even sell them in my Etsy shop, OffBeat Betty.  But if you are handy with a sewing machine, I will teach you to make your own...


 Things You Need:

-Sewing Machine

-Zipper foot 
-Scissors
-Measuring tape
-Straight pins
-1/2 yard or some scraps of cotton material (depending on bag size)
-1/2 yard of PUL fabric (polyurethane laminate. It is water resistant, free of toxins, and easily washed. It is often used in hospitals and for making cloth diapers. You can buy it at most fabric stores.)
-14" zipper
-Coordinating thread (polyester is best)

*The directions are for a 10" X 12" wet bag. You can adjust your size as needed*

1.) Cut out 2 rectangles of 10.5" X 12.5" from your cotton fabric, and 2 rectangles of 10.5" X 12.5" from your PUL.

2.)Lay out one piece of PUL with SHINY SIDE UP. Place your zipper right-side-up on top of the PUL. Line up the edge along one of the short (10.5") sides. Pin in place.

3.)Take one piece of your cotton fabric and place on top of the zipper and PUL with RIGHT SIDE DOWN. Line up short edge with the PUL and zipper, sandwiching the zipper between PUL and cotton.  Pin in place.


4.)With a zipper foot, start at one end, backstitch, and sew as close to the zipper as possible.

5.) Take the cotton piece and the PUL piece and fold open the opposite direction so the RIGHT SIDE of the cotton is facing up and the PUL shiny-side is facing down. Topstitch along the zipper on the exterior cotton side, making sure all fabric is pulled to the left. As you sew, pull the the PUL taught so it will not bunching on the inside and cause your zipper to catch when trying to open and close the bag.

6.) Repeat steps 2-5 on the other side of the zipper.  You should end up with something that looks like this:

7.) Cut a 4"X14" piece of fabric for the handle (You can use the same cotton or a coordinating color) Fold in half length-wise and press.

8.) Using a 1/4" seam, sew the two long sides of the folded handle together, lengthwise. Turn handle right-side out and press flat.

9.) Top stitch a 1/8" seam down both long sides so it looks like this:
Fold in half to make a loop. 

10.)Take both cotton sides of the bag and flip them so they are together with RIGHT SIDES FACING each other.  Pin your handle between both cotton pieces so it is pointing inwards, making sure to leave a bit sticking over the edge. 
NOTE: I like to place the handle on the side where the zipper will be opened from so the handle will add leverage while opening.


11.)>>Pull the zipper at least halfway open<<< 
Pin your cotton pieces along the edges so they are lined up and even.  Do the same with your PUL pieces so the SHINY SIDES ARE FACING each other.
Black line denotes stitching
12.)  With a 1/4" seam, sew down both long sides of the cotton pieces LEAVING THE BOTTOM OPEN and UNSEWN. Be sure the handle piece has been included. Continue sewing carefully over the zipper and onto the PUL pieces. Sew the entire perimeter of the PUL pieces and back over the zipper on the other side.  You should have a seam running the perimeter of the entire bag except for the bottom edge of the cotton pieces.  The only place the PUL and Cotton pieces should be attached is at the zipper...other than that, they are their own separate bags.

13.) Clip all corners. Turn the bag right-side-out through the open bottom edge of the cotton. Stuff the PUL into the cotton portion. Tuck the unsewn bottom edges of the cotton inwards and sew the bottom closed.


And now you have your very own wet-bag!!!  Huzzah!


Wednesday, March 12, 2014

Recycling Pallets Into a Potting Bench Tutorial

This is a Pallet. You can make all things with it.

Sunny days are becoming more and more frequent, which is a BIG DEAL here in the drizzly Pacific Northwest. As soon as that sun starts shining, the sudden hit of Vitamin D causes some crazy chemical reaction of endorphins to explode in my brain and I MUST PLAY IN THE YARD.  I need the sunshine on my face and dirt under my fingernails. 
A few days ago, I took advantage of this sudden boost of energy and decided to actually utilize some wood pallets I had been hoarding all winter into a project:  a potting bench. I have always wanted one but never had the room in my previous small apartment dwellings. Plus, this was my opportunity to prove to my husband that I'm not just a crazy bag-lady who swerves off the side of the road collecting abandoned pallets every time she sees one. I WILL USE THOSE PALLETS and turn them into AMAZING THINGS, DAMMIT.  They will not just rot in a pile of Pinterest-fuled good intentions. 

So.... here is what I did.  And all of you pallet hoarders can also do something similar to prove you aren't a hoarder:  You are a collector of magic.
Potting bench, huzzah!


THINGS YOU WILL NEED:
-2 Pallets
-A Crow Bar or cat's paw
-Hammer (a regular or sledge)
-Electric saw
-Electric Screwdriver
-Screws
-Work Gloves
-Safety Goggles
-Paint and/or Wood Stain


1.) Tear apart your pallets. This is accomplished by wedging the most curved end of your crowbar under the nails and pounding it in as far as it will go with your hammer. You are trying to get the best leverage possible. Then push down on the crowbar to lift the boards.It does take some muscle and a good deal of effort, but I find it cathartic especially after dealing with a full day of toddler melt-downs....

Another way you can accomplish this is using an electric saw to cut through the existing nails like this:

Depending on how comfortable you are with a saw, it could be easier than the crowbar/hammer method.  Since my Sawzall is kaput right now, I did the crowbar method. And also because sweating to death is sexy.

2.) You will end up with a pile of the thinner top/bottom slats and 6 of the thicker support pieces (each pallet has 3 support beams). Cut the support pieces into the following lengths:
3 ft. X 2  (front legs)
4 ft. X 2  (back legs)
21" X 4    (cross supports to hold legs together and support     table top and bottoms shelf)

Since I was too involved with the building, I forgot to take pics of the frame work.  So here is a crappy pictoral diagram to explain how your pieces will be assembled:


3.) Take a 21" piece and position it just far enough down on one side of a 3ft piece to account for the depth of your table-top boards (which will be made from the thin pallet slats)to allow it to be flush. In my case, my table-top pallet pieces were about 1/2" thick, so I screwed the 21" piece 1/2" down from one end of the 3 ft. piece.

4.) Measure the appropriate distance down the inside of a 4 ft. leg so that your 21" connecting piece will be level. Screw in place.  The finished thing should look like this (with the exception of being a crappy picture): 


5.) Repeat Step #4 for the other side of your table. Remember to make it a MIRROR IMAGE of the one that you just completed so that all 21" pieces will be positioned towards the center of your table.

6.) Now you're going to make the table top and lower shelf using the thin pallet slats. Depending on how wide you want your table, you may need to cut the slats down from their existing 40"  length. I needed my table to be 30" wide, so I ended up cutting them.
 Take the thin pallet slats and position them along one top 21" connecting piece. Screw down the ends into the 21" piece. Take the other leg-frame and screw the opposite sides of the thin top-pieces down the length of the second top 21" connecting piece.  (you may need a helper to hold the leg pieces in place while you do this).  Now, the leg frames should be connected by the slats.
Top of potting bench


Under-view of the potting bench top to show how 21" support boards are connected to legs, and how slats rest on top.

7.) Repeat step 6 for the bottom shelf.

8.) Make the top shelf by laying a remaining slat flat across the tops of the 4 ft. leg-pieces. Screw each end in place. You can use another to run along the back of that shelf to create a "lip" if you would like, but it is not necessary. I just think it looks more aesthetically pleasing and helps items from falling off the back.
Front of upper shelf

Back of Upper Shelf

9.) Paint and/or stain as desired.  You are done!

SOME NOTES:
My potting bench has a height of 3 ft. because that is what is comfortable for me while standing and potting. You may, of course, adjust the height to your needs.  The same goes for the depth of 21" and width of 30"... it's what fit comfortably on the space on my porch.  Your table could easily be made deeper and wider as needed. Keep in mind that wider benches may need a central support beam to keep them from sagging under heavier items. Happy building!


Tuesday, March 11, 2014

Recipe: Mac-n-Cheese with Goat Cheese, Chicken & Rosemary

Okay, the following recipe is easily one of my favorite recipes ever. It's equal parts comfort food, exotic fare, and delicious. Mellow enough for a night in by the TV, or fancy enough for a nice headliner at a special dinner with friends. 
My darling, picky eater of a husband usually hates goat-cheese, but he can't get enough of this recipe (it also helps that I didn't tell him there was goat-cheese in it until after he finished it and asked for seconds). My toddler son will even eat it.  I figure a recipe that my whole family enjoys is worth its weight in gold!


Mac-n-Cheese with Goat Cheese, Chicken & Rosemary

1 tsp oil
8 oz goat cheese
2-3 sprigs of fresh rosemary, chopped
1 lb cooked, shredded chicken
1 clove garlic, minced
1 quart heavy cream
1 lb package of uncooked rigatoni pasta
Salt and Pepper to taste


1.) Bring a large pot of water to a rolling boil. Add rigatoni. Cook according to package.

2.) While waiting for water to boil, heat a small amount of oil in a large saute pan or skillet. Add garlic and saute about 2 minutes. Add cream to skillet. Simmer on medium-high heat until liquid is reduced by half and coats the back of a wood spoon.

3.)Add rosemary and goat cheese and simmer, stirring until cheese is completely melted and combined with cream.

3.) Add shredded chicken to cream mixture. (I either pre-boil chicken breasts and shred it with a fork, or you can save time by buying a whole pre-roasted supermarket chicken and shredding). Let simmer for another 5 minutes or so, stirring occasionally.

5.) When rigatoni is al dente, drain and add to chicken/cream sauce and stir until combined.  

4.) Add salt and pepper to taste.  Serve immediately garnished with a sprig of fresh rosemary and enjoy!


Monday, March 10, 2014

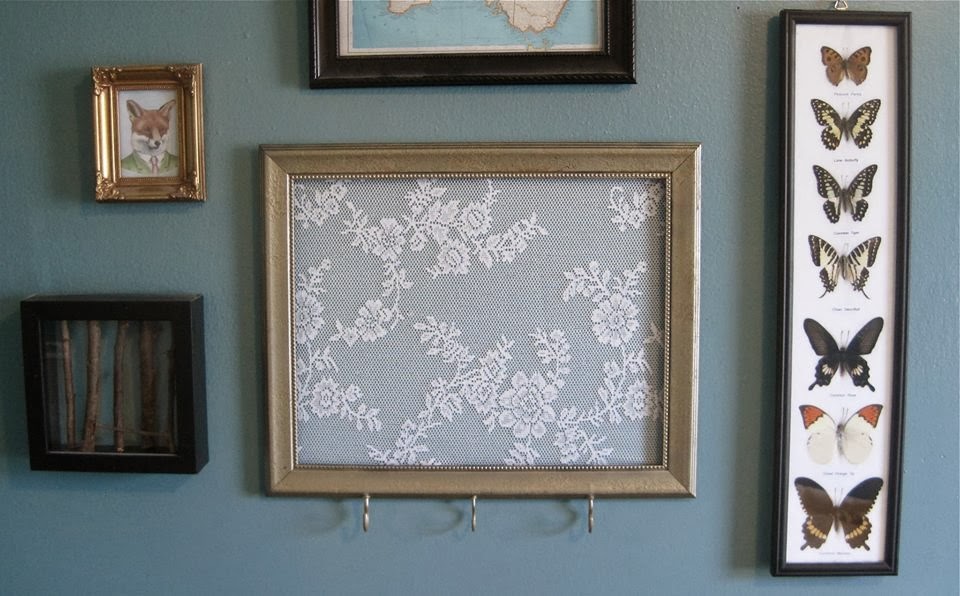
Sweet and Easy Jewelry Organizer Tutorial

For quite some time I had my necklaces sitting in an antique silver dish on my dresser... and while it looked pretty it is not practical at all. The constant untangling of my necklaces was obnoxious to say the least (First World problems, right?) Anyway, I got an idea one rainy day and was able to bring it to fruition with stuff I already had lying around the house.


Things You Will Need:
-Empty picture frame
-Vintage lace curtain or purchased lace material
-Spray Paint (I chose "Gold Rush" from Rustoleum's "Hammered Finish" line.) 
-Glue gun or craft glue
-Screw-in hooks

1.)Remove any glass and backing from your picture frame. Take as many screw-in hooks as you need and screw them into the bottom part of the picture frame so they are all facing forward.
In a well-ventilated area or outside, spraypaint your picture frame and hooks to the desired color (the "Hammered Metal" line of Rustoleum paint is pretty cool because it gives a weathered patina finish)  Allow to dry.

2.) Take picture frame and lay on top of lace curtain/fabric to use as a cutting guide. Cut lace to appropriate size.

3.) Grab your pre-heated glue gun and run a bead of glue along the perimeter of the picture frame back (you can use craft glue, but I like a glue-gun because it dries very quickly and requires less time holding fabric).  Add lace and pull taught.  Let dry.

4.) Hang on wall. Add jewelry.  Stand back to admire the fact that you have a badass organizer that didn't cost $40 at Urban Outfitters.


Sunday, March 9, 2014

A Little Cooped Up

I just got back from a trip to the local feed-store, and was reflecting on how inexpensive it actually is to raise a small flock of chickens. A $25, 50lb bag of feed generally lasts them several months if they are allowed to free range. A huge bale of pine shavings ($11) has also lasted me several months, even when cleaning out the poo from their coop on a weekly basis. Actual chickens themselves are inexpensive, usually only running $2-$10 for chicks. 
  
  Perhaps the most expensive part about owning chickens is building or purchasing a coop. If you are handy with tools, I would highly recommend building your own coop instead of purchasing because you will literally save hundreds of dollars and end up with exactly what you need. After purchasing some 2X4's and scoring some plywood off Craigslist for a great price, the total cost of the coop was about $130. Basic pre-built coops are usually more than twice that cost.
  
  Chickens need, on average, 4 sq/ft per bird inside the coop and about 8-10 sq/ft per bird in the outside run (a bit less if you have bantams). If you are planning on free-ranging exclusively, they do not need as much room in the run. If they will not free range at all, they will need much more than the 8 sq.ft.  My 6 girls have an enclosed run attached to their coop and then are allowed to free range a good portion of our yard all day.  Even though they free-range, I opted to have a sizeable 5'X12' run so they could have a large covered place to get shelter when it's raining besides the actual coop. We live in Seattle. It rains a lot.


The enclosed upper coop portion is 5'X5' square with 3 nesting boxes. Usually, you only need 1 nesting box per 3 or so chickens, but since they usually ALL only choose 1 to use, I wanted to give them options.  There is a roost running along the inside of the coop so they can perch at night.  Most people I've talked to didn't know chickens liked to get up in a high place to sleep... I didn't at first.  But mine all jump up on the roost and snuggle together for warmth. It's pretty adorable.
3 nest boxes with rear access, and roosting perch along the interior


I used hardware cloth on the outdoor run for safety from predators. It is considerably more expensive than chicken wire, but worth it in the long run. Chicken wire, although called as such, is not ideal for chicken safety. Especially from raccoons who can rip right through chicken wire and kill your entire flock in a matter of minutes. It is also important to have a real latch on the door (not just some hook-and-eye sort of deal) and perhaps even a lock. Raccoons have very dexterous hands and can get into anything a 2-year-old child can. When my son turned 2, and easily opened the chicken coop, I knew I had to make a change.  Raccoons can also collapse their spine to a matter of 1 inch... so keep that in mind and account for any gaps in doors, roof, etc. I call my coop "Fort Klux" since nothing can get in or out.
Hardware Cloth is much more durable than Chicken Wire
Chickens create a lot of waste, and pine shavings are a great thing to use inside the coop. Some people like using hay, but I found hay gets gross pretty fast here in the wet and humid Pacific Northwest. Hay also seems to attract bugs and mites, so I opted to change to pine shavings and have had better success. Using the "deep litter method," fill the coop with at least 6" of shavings to help catch waste and keep constant cleaning to a minimum.  I still scoop the poo once a week in the areas it collects most (usually under the roost) and add it to our compost. I deep clean the coop once every 3-4 months. It is important to keep the coop clean and dry so ammonia does not build up and cause respiratory issues in your birds.  
As far as the run is concerned, sand is an ideal ground cover to have in the run because it is inexpensive, does not mildew, is easy to rake and scoop to clean, and gives the chickens a place to roll and dust bathe (PS, a dust-bathing chicken is pretty much the cutest and most hilarious thing ever)

Here is the beginning frame-work of the coop and run. It is very basic as we were not able to spend a ton of money, but gives the chickens what they need. 
More specific measurements:
Upper coop portion is 5'X5' and runs 2-3' tall w/ the slant roof.
The run is 5'X12' and 4' tall with a shorter area that extends under the coop.


If I were to win the lottery and do things over, I would make the run high enough for me to stand up in for easier cleaning without hunching over. But for now as long as the chickens are happy, I'm happy, because they are the ones spending the most time in it.


Saturday, March 8, 2014

Fun With Textured WallPaper

I have fallen in love with textured wallpaper within the last year. Mostly because of the amazing patterns that are available now, and the fact that most are paintable. It is a relatively inexpensive way to add interest not only to walls, but a plethora of other items as well. 

When we first bought our home, we were excited about the fact that it had a fireplace. But we were not excited about the hideous stucco texture all over the hearth/mantle and the painted black brick work. 


I promise the picture isn't doing the nasty, rough, stucco texture justice.  But trust me... if you brushed up against it, it would make you bleed.

My husband suggested building a fancy wood mantle encasement, which would be extremely lovely except for the fact that there were a gazillion more things to do around the house that were demanding the little time and money we had.  We could live with the fireplace as-is.... for awhile anyway.
And then, quite randomly, I came across this awesome textured wallpaper from Graham & Brown ( $19 for 56 sq/ft).


It was so lovely that I bought a roll of it without quite knowing what I was going to do with it... just that I had to have it.  And then a few days later, I had the crazy idea of using it on our mantle! Even though the paper came pre-pasted, I opted to buy separate heavy-duty wallpaper paste to make sure it stayed.
I commenced to sanding down as much of the horrid stucco texture as possible. I measured and cut the paper to fit the mantle and covered the back of each piece with paste. Being careful to line up the seams/design and smooth any air bubbles out, the paper went up much easier than anticipated. And I really like the results!


It really fits the decor of our home and mimics fancy stamped stonework. And I still have more than half the roll left! So, for about $8 I changed the face of our hearth.

After that I became a believer in textured wallpaper. Since then I scored some "bead-board" style paper and have used it as budget-friendly wainscoting in our bathroom:


then added a vintage cottage feel to our interior doors:


And pasted it througout my entire sewing room:


For a fraction of the cost of fancy stonework or real bead-board, I was able to bring some warmth and character to our little home.